Writing an Addin - Quick Start
So you’ve heard of Dover, want to try it and do not know where to start? Follow up this nice quick start tutorial to write your first addin. In this post you’ll learn how to create User Forms, UDOs and update System Forms, as well as how to create menus and addin startup instructions. At the end of this tutorial you’ll have the download link for the tutorial source code.
Creating the project
It’s important that you have Business One Studio working and running on your computer, since this tutorial will use it to create forms and wire events. Dover do not require it, you have the choice to use XML forms directly on it, but this will be the scope of a separate tutorial.
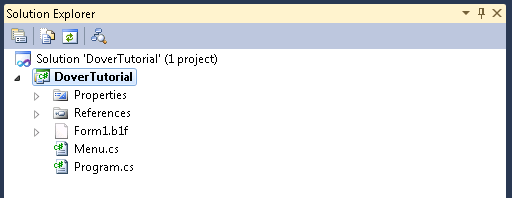
Create a SAP Addon Project on Visual Studio. You’ll end up with an structure like that:
After that you’ll need to add the Dover Framework external reference. You have two options here:
- Add it as an external DLL. This is the easiest and preferable way if you do not want to debug and/or add new features to the Framework.
- Clone dover on git and add it as an existing project on your solution. This is the preferable way if you want to debug and contribute to the Dover Project.
For the first option, download the latest Framework.dll from our Downloads and add as an external resource in your project. If you prefer to clone the project source code, you have the option to clone it on a separate directory or also add it as a submodule of your project, if you’re using git. If you need more information on that, you can browse online on various git tutorials or check GitHub help
Cleaning up B1Studio.
Even with the standard Addon solution from B1Studio, there is already some stuff Dover do for us. First thing is event handler. App and Menu event can be completely removed, meaning that Menu.cs can be deleted from the solution. You’re not going to use Application from SAP Business One Studio anymore, instead you’re going to instantiate Application from Dover Framework, that will internally instantiate DI and UI API. You’re Program.cs will be like this at the end:
using System;
using System.Collections.Generic;
using Dover.Framework;

namespace DoverTutorial
{
    class Program
    {
        /// <summary>
        /// The main entry point for the application.
        /// </summary>
        [STAThread]
        static void Main(string[] args)
        {
            try
            {
                Dover.Framework.Application app = new Dover.Framework.Application();
                app.Run();
            }
            catch (Exception ex)
            {
                System.Windows.Forms.MessageBox.Show(ex.Message);
            }
        }
    }
}
That simple!
Upgrade your forms
Now you have all your code relying on Dover Framework startup. Unfortunately, there are some startup code embedded on SAP B1Studio Form classes that blocks us from using it. But don’t worry, all you have to do is to change the class your forms are extending from.
- UserFormBase, change to DoverUserFormBase.
- SystemFormBase, change to DoverSystemFormBase.
- UDOFormBase, change to DoverUDOFormBase
That’s it! You’re ready for the next step.
Configuring your solution
Dover help you manage all the life cycle of your application, from installation to upgrade and testing. I’ll discuss this latter on a separate post, but for now all you need to know is tell Dover your name, and where we’re going to add our forms from, so it can register it properly. To do so, add an AddinAttribute to your main class:
[AddIn(Description="My Test App", B1SResource="DoverTutorial.DoverTutorial.b1s")]
class Program
So we’re telling Dover that our Description is “My Test App” and that the compiled b1s file can be found on the fully qualified resource name “DoverTutorial.DoverTutorial.b1s”. So it’s important that you compile it once and embed the compiled b1s file to your solution. To do so just right click on DoverTutorial, click “Add -> Existing Item”, and select DoverTutorial.b1s located on folder bin\Debug.
Dover add flexibility for Addin development. Instead of relying on a b1s file on your Addon folder, you can specify as many b1s file as you want. You can also specify an embedded XML for some specific form, this and some nice features will be explained on some advanced topic posts. What this mean is that you can split your development in multiple modules, one for each functionality, again reducing maintenance and support. A Bug fix on a module that a few customers use will require an update just on those customers, instead of releasing a whole new version of a big addon.
Setting up Menu and Events
Now let’s add the Form1 menu and it’s corresponding event. To add the Menu, we’re going to add a Menu Attribute to the Form1 class:
[Menu(String="DoverTutorial", Type=BoMenuType.mt_POPUP, UniqueID="doverTut", FatherUID="43520")]
[Menu(String="My Form", Type=BoMenuType.mt_STRING, UniqueID="doverTutForm", FatherUID="doverTut")]
[AddIn(Description="My Test App")]
class Program
What the MenuAttribute does is tell Dover that this addin needs a menu. It’ll handle all necessary events for it, including checking if menu exists, if it has changed, and some correlated events like language change, that need to have all menus recreated. The attributes are pretty the same we use on UI-API, but are setted on an annotated style.
One important thing to notice is that this can be placed anywhere in your code. We choosed to concentrate all menus annotated on the main class of the application.
Now we just need to tell that the menuEvent with UniqueID of doverTutForm will trigger Form1 creation. To do that, annotate Form1 class like this:
[MenuEvent(UniqueUID ="doverTutForm")]
[FormAttribute("DoverTutorial.Form1", "Form1.b1f")]
class Form1 : DoverUserFormBase
And we’re done! We can already deploy it on Dover.
Debugging your Addin
When you start your application, it will start up the Dover Framework Application, that basically will load all installed addins on the database it’s running on. If it’s the first time the Dover is starting up, it will create some user tables to properly run it.
One nice thing of Dover is that you’ll never need to worry about Addon Setup creation, and the addin is deployed on each database. This means that you can have different versions of your solution running on different business one databases, without having a whole new testing environment. With standard addons this is not possible due the fact that the addon is stored on SBOCOMMON database, and an upgrade affects all attached databases.
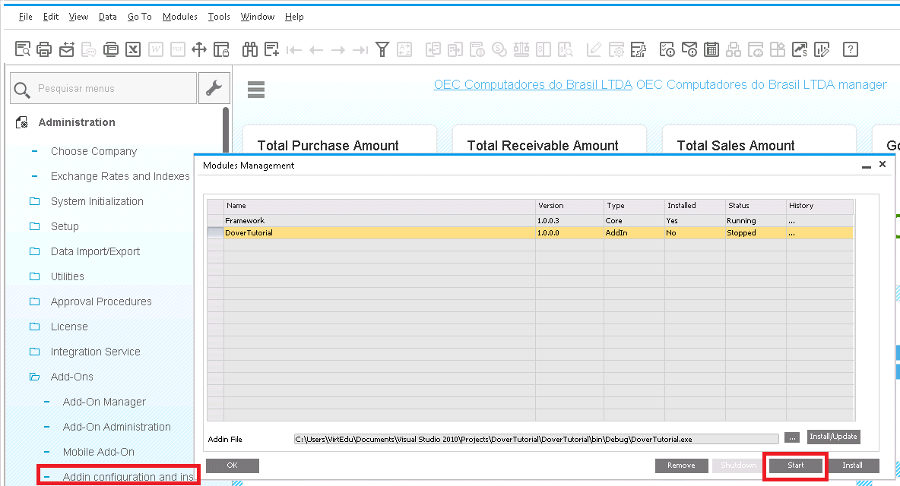
So, to debug your addin you’ll need to register it to the Dover Framework at: Administration -> Add-Ons -> Addin configuration and installation. Select your addin .exe file and click on Install/Update. After you’ve installed it you can select DoverTutorial line and click on Start.
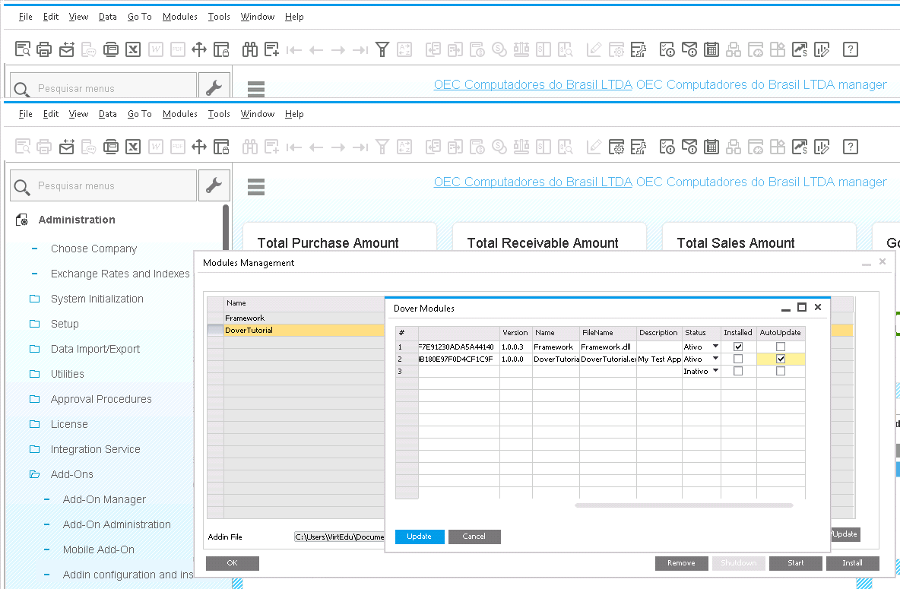
You’ll notice that when you change something at your addin, the first registered addin will actually run. As said before, Dover always run the database registered addin, so you can have test databases without setting up a full development environment. To easy development, a feature called auto-update exists, that will automatically upload the new compiled addin for each run, but it’s hidden to the users. To access it go to tool -> user defined window -> Dover Modules. Go to the last column called AutoUpdate and enable it for the newly added addin.
Now you can continue editing and debugging your addin without any additional steps!
Installing it
As mentioned before, you’ll never need to worry about installation. To install it on production, simply download one of our setup, install it and deploy your addin the same way you did for debugging, but without turning on auto-update feature.
What’s next?
Now you know how to handle Menu, Menu events and what classes handles UserForm, SystemForms and UDOs. With Dover you can also do:
- Automatically create UDO/UDT/UDF when installing, without additional code.
- Handle Form (UDO, UserForm and SystemForms) internationalization
- Check for events exception and threat it automatically
- Automatically create and manage Business One Transactions
- Help you test and deploy new versions of your solution, minimizing your support.
Try it out!
Download the source code for this tutorial on the download page.