Working with Forms
Here you’ll learn how to properly work with forms using Dover. You have the option to import your b1s file from B1Studio or also work directly with XML forms, having both choices their advantages and disadvantages, which will be discussed here. I’ll also show how Dover helps you with proper exception handling, making your solution more robust.
Prerequisites
I’ll assume you already know how to start a new project with Dover, create menus and menus events to open your Forms. You can learn this at the Quick Start Article.
Working with B1S files
When you’re working with B1Studio, it’ll generate a file called b1s at your solution main folder that embed all your forms. Be aware that this file do not have all the necessary information to create your forms, they will be created when you compile your solution by B1Studio, which generates a new b1s file on the output folder (typically bin/Debug or bin/Release). If you compare this file with the original one on your solution home directory, you’ll see that there is a XML project tag with a name property named VSIcreated. This is the XML file we need.
To work with this file, you just need to copy it to your project and embed it, as an embedded resource file. Remember that you’ll need to do this all the time you change your Forms. You can choose to automate this task adding a post-build event command line in your project solution, but you have to remember that the first time you run the project, it’ll always be running with the old XML file, so be sure to first compile your project and than run Debug. This will prevent you from debugging the solution with the wrong b1s file.
After you embedded it, you’ll need to tell Dover where he can find it. So suppose your resource file is called QuickStart.b1s, and your project namespace is also QUickStart, this is what you’ll need to add:
[AddIn(Description="My Test App", B1SResource="QuickStart.QuickStart.b1s")]
class Program
Remember, the B1SResource is allways in the notation: Namespace.Filename.
The QuickStart tutorial is configured this way. You can download the source code at the Downloads page if you want to check a running example.
Working with XML files
Somewhere you’ll find yourself with the need to work directly with XML forms. If you need that, don’t worry, Dover supports this for you! When you’re creating a Form using B1Studio, it become annotated automatically this way:
[FormAttribute("DoverTutorial.Form1", "Form1.b1f")]
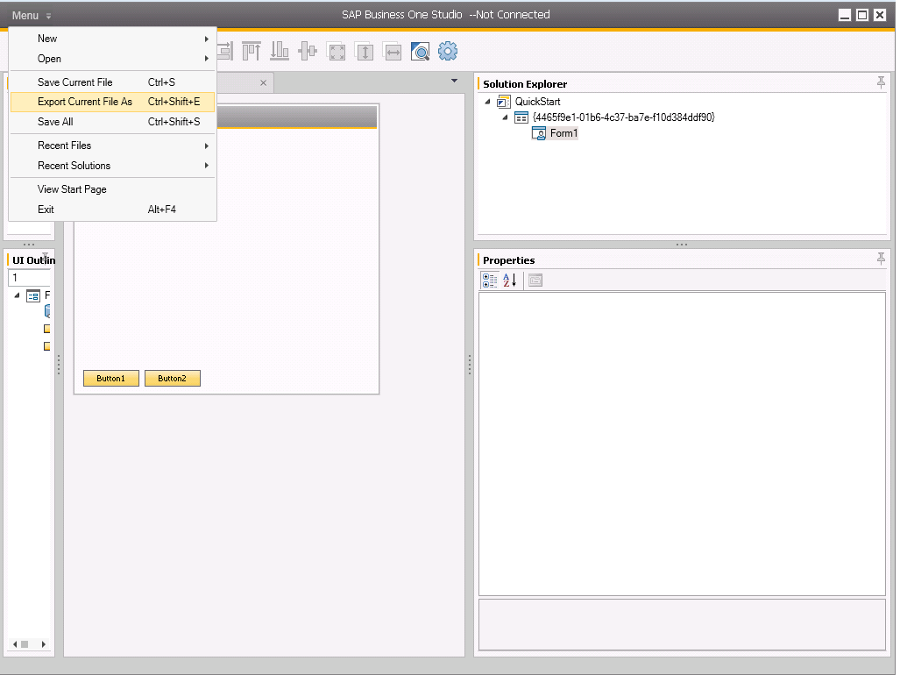
public class Form1 : DoverUserFormBaseThis means that it will look for the form named Form1.b1f in the b1s file, in this case QuickStart.b1s. You can open that file directly in Business One Studio (outside Visual Studio), open the form you wish to edit and export it click on the menu -> export current file as.
After doing this you need to import the newly created Form1.srf into your solution and mark it as an embedded resource. Suppose your namespace is called XMLForm, change your Form annotation like that:
[FormAttribute("DoverTutorial.Form1", "XMLForm.Form1.srf")]
public class Form1 : DoverUserFormBase
This will tell Dover that the resource for Form1 needs to be loaded from the embedded resource with the fully qualified name as XMLForm.Form1.srf. Now you can edit your .srf file like a XML file, or if you need, you can still open it using B1Studio, since it support this file format.
One thing that you need to keep in mind is that B1Studio will not understand that the srf file is being handled by your addon, because now you have decoupled it. So some things like double click a button and automatically create the code for you will not work anymore. I recommend copying the content of your form and deleting it, and create a new file with the same name, but as a standard C# file, to prevent B1Studio messing with your code.
Event handling
You’ll notice that if you try to deploy your addin you’ll get a Proxy error. Proxies are a form to implement AOP (Aspect Oriented Programming) and widely used on Dover Framework. They’re used basically to wrap all events into an automatic try {} catch {} block, with nice logging and trace windows. Doing so we prevent any crash on our UI-API instance, since if there is any uncatch event on UI-API, it stop working. One good advantage of that approach is that there is more information for you to support your customers, because of the trace window and enhanced logging.
If this is done automatically, what do you need to worry about? Almost nothing, just be sure to follow this two rules:
- Your class must me public. If you want to hide some implementation, no problem, make all methods internal or private. But to be able to proxy it, Dover must be able to override it, so your form classes must be public.
- Dover Framework should be able to override your event implementation. That means that your methods should be virtual and protected, never private. Following there is an example.
protected internal virtual void myButton_ClickAfter(object sboObject, SBOItemEventArg pVal)For proxies Dover uses the library DynamicProxy from the Castle Project. You can get more information on their site, if you’re interested. There is also a nice tutorial on DynamicProxy.
Download the code
All tutorials can be downloaded at the download page.